Showing posts with label sewing. Show all posts

Friday, June 19, 2015

A Velvet Bonnet for Agnes

My bonnet-pattern testing phase is still going, although often interrupted by other things. I was blazing away on this project when mom died, so I've only just gotten back to finishing it.  One of my friends from the ORS (she now leads in the WRS group) asked that I make her a bonnet/hat with a triangular top. She asked me this eons ago when I made another one that ended up being super small. She sent me all the supplies for covering and decorating, and it idled on top of my bedroom closet for months.

But finally, when I made the capote bonnet, I decided since I had everything else out, I would go ahead and design this bonnet for her.


The basic frame, assembled. I started with a paper mock up, then a
poster-board model. I used that to cut the buckram.
I wired both ends of the pipe and the outer edge of the brim.
I then shaped the wire into a triangle. Carefully.

I cut the top cap accordingly. Don't mind the small photo-bomber.


It's a little big on the head, which is a good thing. The last one barely fit
her, so that was a problem. LOL.

I put bias tape on the edge of the brim and the top of the hat to avoid
any unsightly wire eventually wearing through.


I hand sewed everything, but for this part, I did cheat and used
rubber cement to affix it there. Sue me.

I then added mulling. I whip stitched most of it in place. I lined the
outer bonnet. 
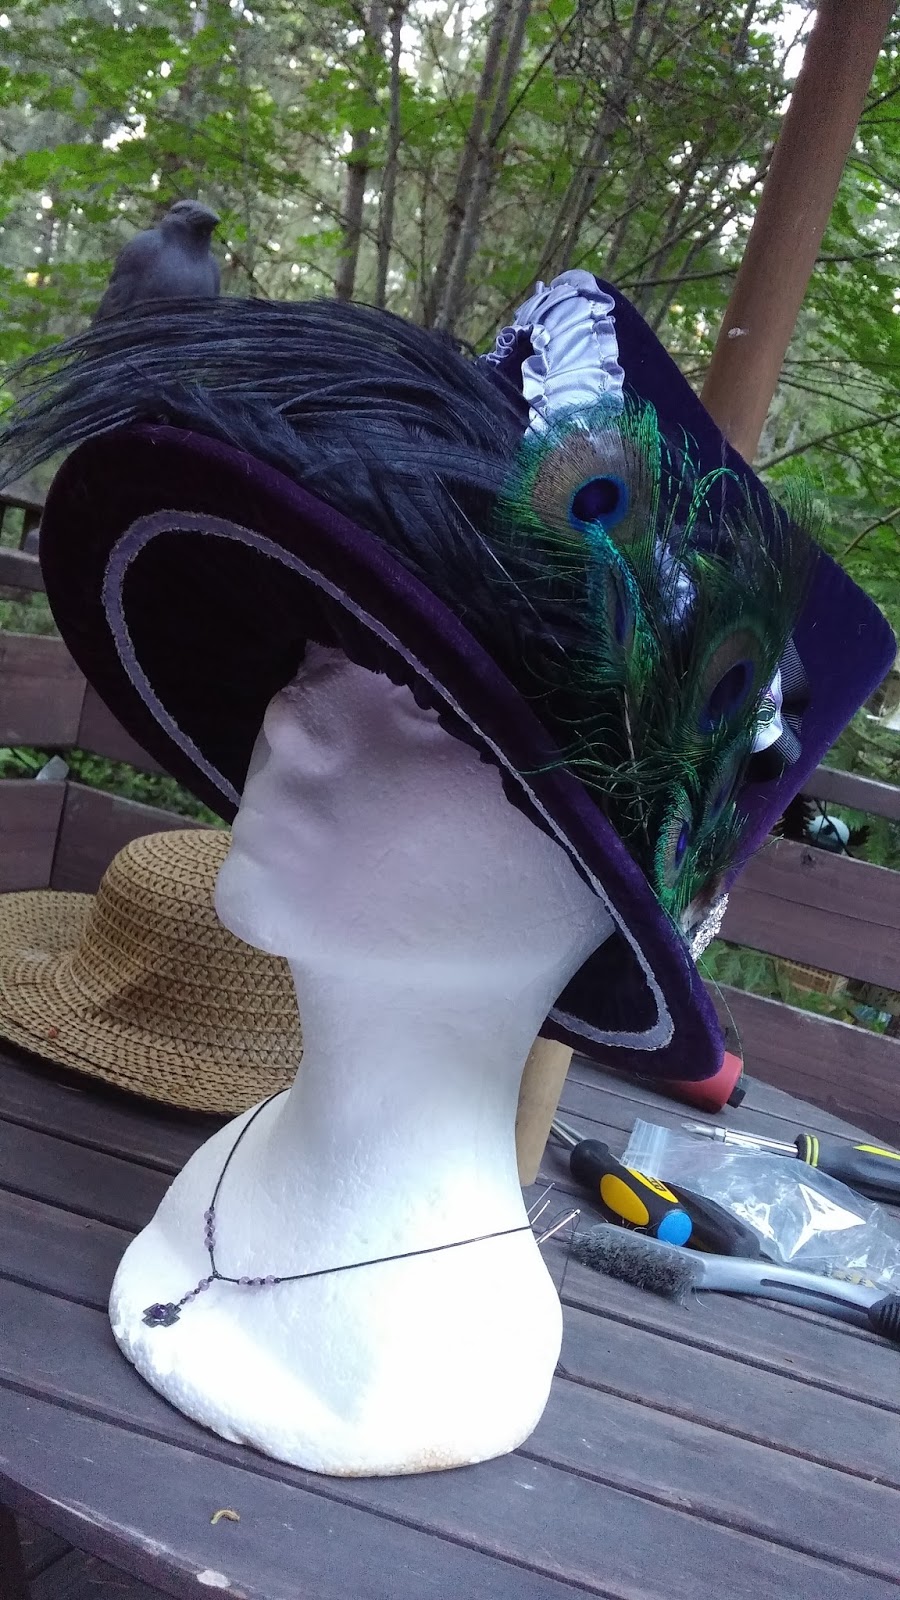
Then it was just a matter of covering and decorating it.  Agnes sent me some velvet, some moire ribbon that was really wide, some pale slate blue ribbon, an assortment of feathers, and some embroidered thistles.  I tried to use everything in a tasteful way.

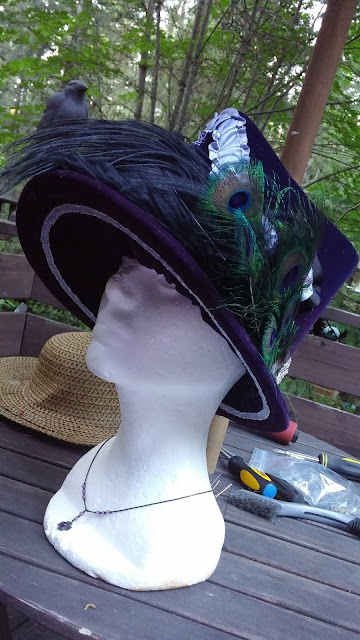
I made the feathers into a separate bundle with a ribbon base that can be pinned to the hat, or removed as desired. There is a lovely black ostrich feather, and several small peacock feathers. 

I made some cockades wherein I added little pouffes made from the embroidered thistle.

The most time-consuming bit was the line on the inside of the brim. It is a line of the same ribbon, which frayed. I then stitched a little silver border along both sides to neaten it up. The silver is also repeated in the ruched ribbon chevron on the front of the bonnet.


If I hadn't run out of the blue riboon, I might have taken the ruching
all the way 'round the back between the two cockades too.


You can see, the feathers can be removed.

It's difficult to see, but the inner brim is ruched. I lined the inside of the
hat with the wide moire ribbon, which is black.


All in all, I think it's a lovely bonnet. I kept it simpler, because it is the kind of bonnet you want to add stuff to. I hope Agnes likes it. She waited long enough for it. Sorry Agnes. :)  I think this pattern is a win. I might do several top-shape options on it, as well as a variety of brim-styles.

Sunday, April 26, 2015

The finished test capote bonnet

Thoughts? I think it looks somewhat like the original. A few tweaks of the design and it'll be ready to put up as a pattern. The angled arm on the brim is broader on the original. And the back has a bigger area to tuck in the updo. But it is a start! Onto another test with some modifications. I will be bundling this pattern in with another bonnet pattern--and selling them on my blog page along with my other patterns.


I'm auctioning off the test-bonnet. It's not the best craftsmanship, it's a bit sloppy, so I'm making a starting bid of $25. You can bid HERE.

Thursday, April 23, 2015

A hat, a hat, what'd'ya think about that? Capote bonnet time

So my funk seems to be lifting a bit. I'm back on Pristiq, since our new health insurance actually covers it. I'm still trying to figure out if Providence covered anything at all, except the most basic stuff, because our time with Providence proved to be the most heavily billed time with an insurance provider, ever, and it nearly killed us financially.  This medical system is a joke. A massive joke.

I digress... enough ranting about the American medical system of shite. Onto better things. Like hats. Everybody likes hats. Right?  Well you should.

I've been a big fan of the capote bonnet. I have for a while, but I've always been a bit flummoxed as to how one goes about making them.  I came close enough to the infamous Kate Winslet sea-grass bonnet with my paper lace one that I made last summer. But this particular spoon bonnet pictured below has been something I've coveted for some time:


It's really unique. I love the shape. So I endeavored to create a pattern to make one yesterday, in spite of the constant, and annoying interference of my little son.  I think I've come close. I will add some trim to this one, and maybe make one more test bonnet using the pattern, so I can lock down the best way to cover it.  The hat frame itself is easy. It's the covering of it that's the bitch.

The pattern was easy enough to come up with.  It's always useful to have a foam head, because it really helps to shape things. But foam heads are also small--so I have to keep that in mind when I'm patterning hats. I started with two pieces of regular paper (where I sustained my project injury in the form of a paper cut -- usually when hatting, I pierce at least one finger with pins so this is an unwelcome change).

I sketched out teh general shape of the brim piece, and then measured out the back neck-piece. I transfered this to poster-board, taking care to make it a bit neater. Then, with a little courage, I cut the pieces from buckram. It does not take too much buckram to make this hat.

My general shape in poster-board. It will be refined and smoothened up later.
This is just experiment time. The top is the brim, the little bit is the
back neck piece. The lines are the general placement of the millinery
wire that will connect them.

The necessary supplies. 

I whipstiched the wire to the brim. The trick with millinery wire is to just
apply it without trying to shape it. I did bend it around the corners, but
that is all. Also, I started on a long edge and then overlapped to maintain
stiffness.

I swiveled it on pins to see if the shape and size were good.

Even as an experimentation piece, I wanted a smooth edge. Some bias tape
was added to the edges that mattered. I glued it on. Cheater!

As you see, the back neck-piece has been added and pinned into place as well.

I measured out four wires to connect the two pieces and create the necessary
support for the fabric and shape. In order to attach it to the pieces of buckram
I turned the tips of each wire by 90ยบ so it won't pull off.

I added the wires to the brim. I did not bend them, but I did use the arc of the wire
to my advantage.

I also made sure that the wire was also firmly sewn into place on the edge so
it wouldn't slide back and forth.
 It's here where I began to think about the covering.  I found some ugly silk from a bag of silk remnants I got years ago. And I was going ot make the lining different and then decided against it, I figured I would just use the ugly silk up.  With trim and such, it might not be so frumpy looking.

I measured my wires, and then used the brim to cut a two pieces of fabric together. I tapered the fabric from the width of the brim to the neck piece, and then slit where the little brim angles were so it could pocket right into the fabric once I sewed it up.

The pencil is the stitching. Once stitched, I
turned it inside out. I curled the brim
and shoved it into the narrow end
and then put the brim angles into
the pockets.

Now the wires are sticking out of the bottom of the covering.

I angled the wires at the bottom and began to affix them to the neck piece.

And done. I then pinned the fabric down in place and whip-stitched the bottom
closed. I tacked the fabric down along the top of the neck piece.

And I did the same for the inner edge of the brim. The trim will cover anything
ugly.
No, this is not a picture of two turtles getting it on. It's just showing how you
take the neck piece and affix it to the underside of the brim angle. 

 This is what I have so far.

Because it's an experiment, I didn't use mulling. It would smoothen the whole
thing more if I had.

I think with trim it will look pretty good and close to the real thing.
We shall see! I just need to figure out the best way to cover this, and we're good
to go for a pattern. I might combine it with another pattern and add it to my
downloadables.  I'll post a final pic when it's done.

The little photobomber chewing a piece of steel boning. Kept me on my toes.


That's it for now. I'll post more laterz yo. :)

Monday, January 5, 2015

Where have I been? Who the hell knows?

Things have been weird. I admit it. I have been dealing with an anxiety disorder, and as a self-confessed control freak, this condition has been less than pleasant to manage and cope with. I won't go on and on about the condition, I think I described it well enough in the last post. My challenge has been adjusting medications so that I can function.  I had hoped it was temporary, but alas it isn't. I know this because a small lapse in my anti-freakout meds and I start having flashes of extreme panic. It's so weird. Anyway, besides struggling with fatigue and nausea, I'm okay. I think things are slowly normalizing.  I'm now on Effexor and Buspar. My days of being medication free are over. For now. The upside is that I spend so much time being nauseous that I forget to eat, and I have lost a few pounds.

What has the Hungarican Chick been up to otherwise? Oh, this and that. I was hoping to have two books finished for Comic-Con this year, but I haven't been able to write with all this mental-health crap going on. So I will be promoing my normal stuff, and hopefully selling a few things, like bookmarks and postcards of some book covers (in addition to books and eBooks).

I've done a tiny bit of sewing, not much. Held a workshop on how to make Dormeuse caps, set up this new year's Topsails & Tea for the ORS, baked some, slept as much as I could manage, did a lot of reading, and obsessed over the G5 game 'Secret Society". It's annoyingly addictive. I find however, that the ambient music is really calming. I know.  The child is growing at an incredible rate. We had his Santa picture taken again this year.


He's grown, hasn't he? My boy. ::sniff::  I wish he'd stop growing! He's climbing everywhere and getting into everything. He displays a terrifyingly familiar sense of mischievousness and humour already. We're so screwed.  His second birthday was November 17, but we had a party on the 16th. The house was so full, I thought I was going to have a full on scream and flail attack, but I managed to bite it back and wasn't rude to anyone that I am aware of. So that's  a win. He was spoiled by his family, and then again at Christmas. The house is so full of toys right now I have no idea how to deal with it all. LOL.

Some bears and bunnies I made for a fair at Trackers Earth.
They're made from re-purposed receiving blankets. The bears,
specifically from Alex's receiving blankets.
I've also been job-hunting. Our finances are so terrible, I'm pretty sure that this is what the anxiety problems are about. But I am finding the process to be particularly stressful and painful. I am either under-qualified on paper for jobs I could do with my eyes closed, or overqualified, and all the jobs I find are underpaid. So much so, it would barely cover the $300 a week for daycare if at all.  The constant rejection is taking its toll on my ego. Someone who has such a broad skill base and great learning skills like I do should be a valuable employee, but instead I find myself competing with people with foo-foo degrees and zero experience. It's really annoying, and making me bitter. LOL.

So things have been marginally boring and uneventful on the most part. I've retrenched and been focusing on my mental balance and keeping the baby happy. Now I'm planning for the upcoming Comic Con at the end of January, and trying to prepare enough materials for it. I've done some sewing for a fair (pictured above).  I need to get back into my old habits and get back to blogging and creating. I feel kind of pent-up for not doing so lately.  So apologies to my regular readers for being super-quiet. And here is my video on how to patch/reinforce old jeans where the denim has thinned or torn.


I will work on some projects to share, probably after the 'Con. Happy New Year to all of my online friends and acquaintances. :)

Monday, August 18, 2014

The Ikea Open Robe

Yes, the ORS 2014 Retreat approaches, which is all the excuse someone needs to add to one's regency wardrobe. The last retreat I attended was in 2012, while I was pregnant. I had absolutely no new garments during that time, I was too busy retching and sleeping to do any of that. I may not be making an entire wardrobe, it's impossible in a single month, but I am making a few new pieces to enhance my existing trousseau. I am also taking the opportunity to flush out old pieces and refresh things.

Lovely floral pattern, delicate and broadly tessellated.
This project started as a used duvet and pillow sham set from Ikea.  Specifically, the 'Alvine Blom' set, which has a late georgian style pattern that is really quite perfect for costuming. Their being 100% cotton doesn't hurt either. :)  I saw them for sale in the 'For Sale in Sandy' page on Facebook, a local garage sale site.  She wanted ten bucks. So getting a queen-sized duvet cover with two shams was perfect. I went for it. There was only minimal damage to it, a small tear in the seam, so no big deal.

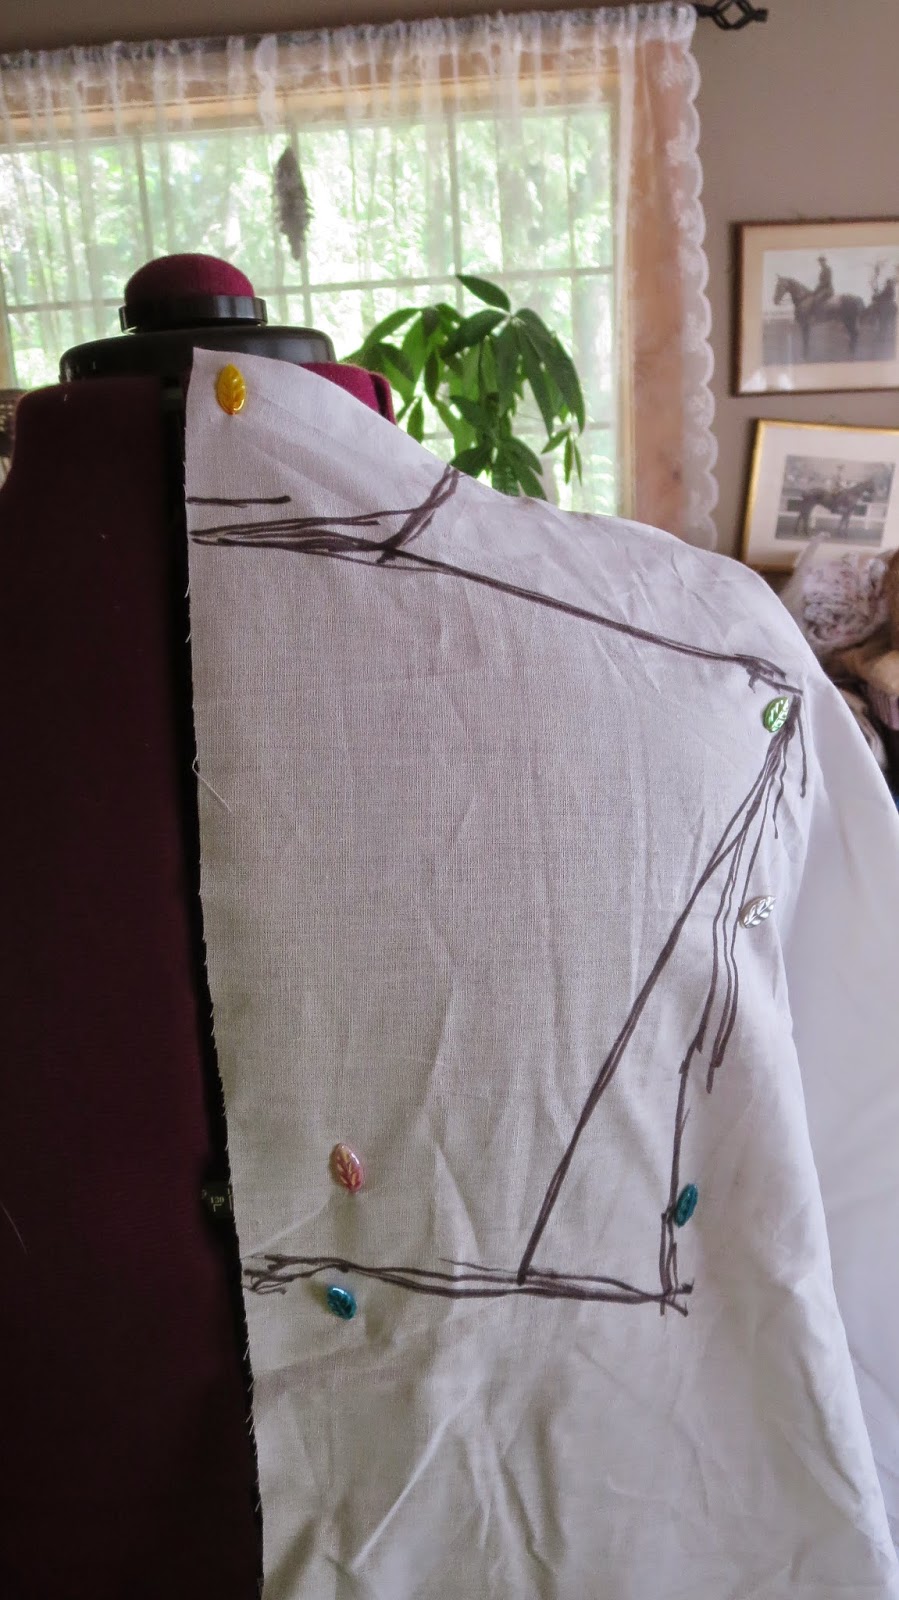
So I began by draping the pattern for the bodice... or more precisely, the lining of the bodice. As usual, I had to test out how I wanted the seaming on the back. My plan was to do deep en-fourreau pleating inside the back piece, and also on the front panels of the open robe, so I would have to know where to pleat and then cut.

Pinning the fabric to the dress
form to start. 

Figuring out where my en-
fourreau back will lie. A few
sketched lines.
I'm fly-by-the-seat-of-my-pants in many of the things I do, from my writing to my sewing and hat making. I've always been this way. I once received a back-handed compliment once from a lady who attended fashion-school. She said: "I wish I were more like you, Stephanie. You just throw yourself devil-may-care into projects, and just do them however you please, and I have to analyze and think about everything before I start the project."  As much as it was a snarky thing to say, it's true. When I see something I want to make, I just figure out a way to make it. I'm too flighty and distracted to do proper research. I'm too focused on the vision to care about obtaining the outcome.

Laying the fabric over the front, I now match the shoulder to the back piece which has been cut out and pinned
to my form.

I never learned formally how to drape. I just started draping. I didn't even know the word 'draping' applied to making patterns on dress forms. And I had no idea I was making slopers. In fact, I had no idea the word sloper existed when I started this stuff. The first time, I draped a gown (my infamous green one), I did it with plastic bags and tape.

Checking my drawing against the cut piece on the back to
make sure they line up.

Drawing the armscye 

Pinning, drawing and aligning, with an X to cut out the
armscye

Classic example of Stephanie style
winging-it. The breast on the dress form is
in the wrong place for Regency. I just
eyeballed where the front of the bodice would
end. It wasn't correct ultimately. But it is
lining, so no tragedy. 

I just do whatever I can to get to the goal. Oftentimes, I'm disappointed, especially with my drawing. I imagine up an image, and when I put the pencil, or paintbrush down, it's not what I envisioned most of the time. I'm too hurried, and too eager to get there to actually slow down and figure out how to make it just right.  So I'm like that with costuming. I see an example of something I really like, and I just throw myself into making it. I don't look up en-fourreau techniques, I just do it how I think it's done. I know next to nothing about hat making, I just make a hat in the way I think it needs to be done. In the end, I've learned something, the ups and downs, the hard way, by choice, apparently, and it either is a win or a lose, but next time, I am a little the wiser.

More lines and experimenting.

The front panel ended up being too short. Not a tragedy, since the front was draped and stitched into shape over
the lining anyway.


Once the lining was cut from fabric sans sharpie marks, I pinned the back in place, leaving the two side-fronts off, and then started pinning the fabric onto the back with the pleating as I wanted it.  Now unfortunately, the memory card I took the series of photos with for this process decided to go corrupt on me. I'm not sure why. It's kind of pissing me off, since it was the few times I actually bothered to take pictures. But it really wasn't easy. The pinning of the pleats where I wanted them, that's the easy part. Marrying the back to the sides, that's where the challenge is.  I took extensive photos of the process, the trimming of the back as everything was stitched down, the capping off of the pleats that extended out, and the draping and alignment of the sides and front. The setting of the armscyes, and the addition of a couple of pleats under the arms to allow for some looseness on the sides.  It really wasn't ALL that different from the ruched gown, really except the wider pleats into the back, which left pleats that needed to be extended out underneath the sides, capped off and trimmed. You can view that linked post for some drawings on how I did the work on that gown.

Mind you, I hand-stitched the whole thing, so it took a great deal of time, mostly done in the hours after Alex was in bed, and sometimes as late as three in the morning. But I got it done.  Here it is without the sleeves on it:

My first gown with a major train,
Besides the one I made from my
wedding dress.

more detail on the back
The pleats on the front panels.
I have this gown that was made for me by Miss Nora of a Baronet's Daughter Designs, a whim on her part, to make me a simple white round gown. I love this little gown. It's super versatile. I wore it at Topsails and Tea, on the Lady Washington, and the lovely ship left her indelible mark on me. Well. On my dress. My wide carriage made getting on and off the ship a bit troublesome, and it made me run my skirts along some freshly tarred lines.

A sweet little gown with nursing panels
and some sweet pin tucks.

The tar stain is mostly gone, surprisingly. Who knew that goo-gone
would be the trick. I scrubbed it with the goo gone, and then tossed
it into the wash.  The stain is on the back of he skirts.

A simple drawstring round gown. Perfectly good for use with an open
robe. Nobody needs to know about the Lady Washington's little act of mischief.
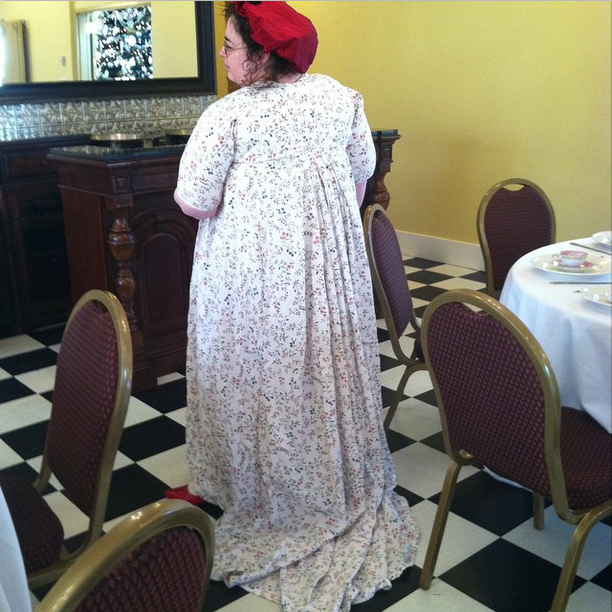
 Paired up with the round gown, I have a nice ensemble to wear for the retreat.


A lovely drape on the train.


A detail of the back, far from perfect, but still pretty.


Looks like my dress form is standing in a hole. LOL. I have her set a bit
lower than my actual height.
 That's the latest project. Onto another! I'd like a new gown or two if I can before the retreat. It's so fun to sew again. It's a bit slow-going doing it by hand all the time, but still, it's satisfying, less messy, and oddly, better-fitting for some reason.

UPDATE: A couple of pics of the gown being worn by chubby moi. This was in December at the Jane Austen Birthday Tea at Ainsworth House & Gardens in Oregon City.


LinkWithin

Related Posts with Thumbnails