Yes, I'm alive. Barely. LOL. I'm just trying to recover from a case of bronchitis, nearly pneumonia, which leveled me for this week. I'm on prednisone and antibiotics and slowly feeling something akin to normal tonight.
What brought me out from underneath my damp rock was a question on my most infamous post (the Benefits of a Bib-Front), which still garners countless hits and Pinterest pins nearly eight years after posting it. Always a plus right? Sort of makes me nostalgic for costuming whenever I see the hit counts. After just checking, seems like the old post on stays on the old ORS blog page is also still often-visited. It feels good to know that my efforts are still found useful. I hope to return to these things soon one day. Once my little cottage* is finished and I can breathe a bit. *I'll expound on that in a moment.
The reason for my post is that someone posted a good question. How do I draft sleeves to a Regency bodice? I tried to answer with just words and it wasn't really working for me trying to explain it without some visual aid. So I uploaded this quick video, very spartan so that it can explain how I do it when I'm cobbling together my various drafted gowns.
If I were smart, I would have made ONE muslin and just used it repeatedly, but I tend to lose my muslins, or I just draft boldly and stupidly onto the fabric itself and then roll with whatever happens. So my advice is, do it in a muslin until it works, and then keep it for future projects. You can add wedges and extensions as you please to whatever basic sleeve pattern you create using my 'technique'.
So that is it. Fairly simple. Center all your measurements on the shoulder mark (top of the sleeve) and it should be a nicely fitted, free-moving sleeve. Add any arc *over* the top of the sleeve, not like how I penciled it, by the way. Seam allowance gives you a little give as needed as well. Wedging in fullness at the top will give you more pouf if that's your cup of tea.
Now, let's talk about THE COTTAGE and its evolution.
Now, everybody who has historically followed this blog knows that I'm a head-case. LOL. I have been stricken with an anxiety disorder that manifested itself on top of a lifelong battle with chronic depression and dysthymia. It has been a huge fucking struggle. I have never bothered to hide it or sugarcoat it, and I will talk about it everywhere I possibly can, because I will not pretend like it's something that I am ashamed of or should be worried might annoy someone to discuss. It is a real problem, and something I have had to take a great deal of pride in accepting. A control freak (who is in essence displaying overt signs of anxiety by desiring to control everything that gives them anxiety) does not like to concede that they have no control over the levels of fear and worry in their own heads.
So I have retreated. I've struggled with a balance of medications, trying to find some measure of normality. But it is a continued battle. I'll have long phases of seemingly normal days and then suddenly have daily panic attacks, some resulting in losing consciousness and striking a great deal of fear in both my husband and sadly, my son, who now has comforting and helping his mother as part of his routine, something no kid should have to do. I found him lying underneath my head once, because I had fallen onto the floor, and he didn't want my head to hit, so he squirmed underneath. This makes me so very sad. But it is my reality now. It has hampered everything I do. And one of the things that once gave me comfort and respite from it, is no longer part of my life. Which is probably a good thing, in the long run, but it means I do not get to see people I became very much attached to over the years.
Oh well.
However, I refuse to go down without fighting. And I don't like the idea that this imbalance of brain chemicals should somehow make me useless. I am a highly creative person, and one that needs many outlets for it, or I will go mad. And my husband knows this, and from the previous post last spring, you can see he cared enough to help me find a place to express it. And he built me my cottage.
It has been slow progress but in the last month, it has sprung forward quite a bit. From being painted up like a lady, to gaining an electrical system with plenty of outlets and light cans, to now being insulated and wall-boarded. The mudding and taping will soon be underway at the beginning of the year, and that will leave only washing up the messy floor, painting, and furnishing it with all my crapola.
Then Feffie's Cottage will be born in earnest. And it will be where I will be vomiting up my creative energy in droves, I hope. From busting out more novels under my Miranda Mayer nom-de-plume to creating more hats and costumes, to returning to miniatures and dollhouses and dollhouse kits, to drawing and making prints and postcards, to fashioning stuffed animals and plushies, to dolls to whatever floats my god damned boat. And I will sell my shit. Because being an anxious ass doesn't mean that I can't contribute to the household. I will just do it on my terms, without an overarching presence who will set off my anxiety and make me crazy.
I hope you folks will be with me on this journey. However it may end up. You've been reading this blog for god... years now, and I'm still here. Scrabbling along. You were with me from the first office specials, the struggle for pregnancy, the surprise child, the costumes, the drama, the snark. So here I am. Hoping to pick myself up and get back to my Hungarican ways. :) Maybe I'll even post a new recipe or something? I don't want to get ahead of myself. These are no longer the days when I posted my updates on the clock of my job. But maybe this can become part of my job as owner of Feffie's Cottage. Maybe.

Showing posts with label patterns. Show all posts
Showing posts with label patterns. Show all posts
Wednesday, December 20, 2017


Friday, June 19, 2015
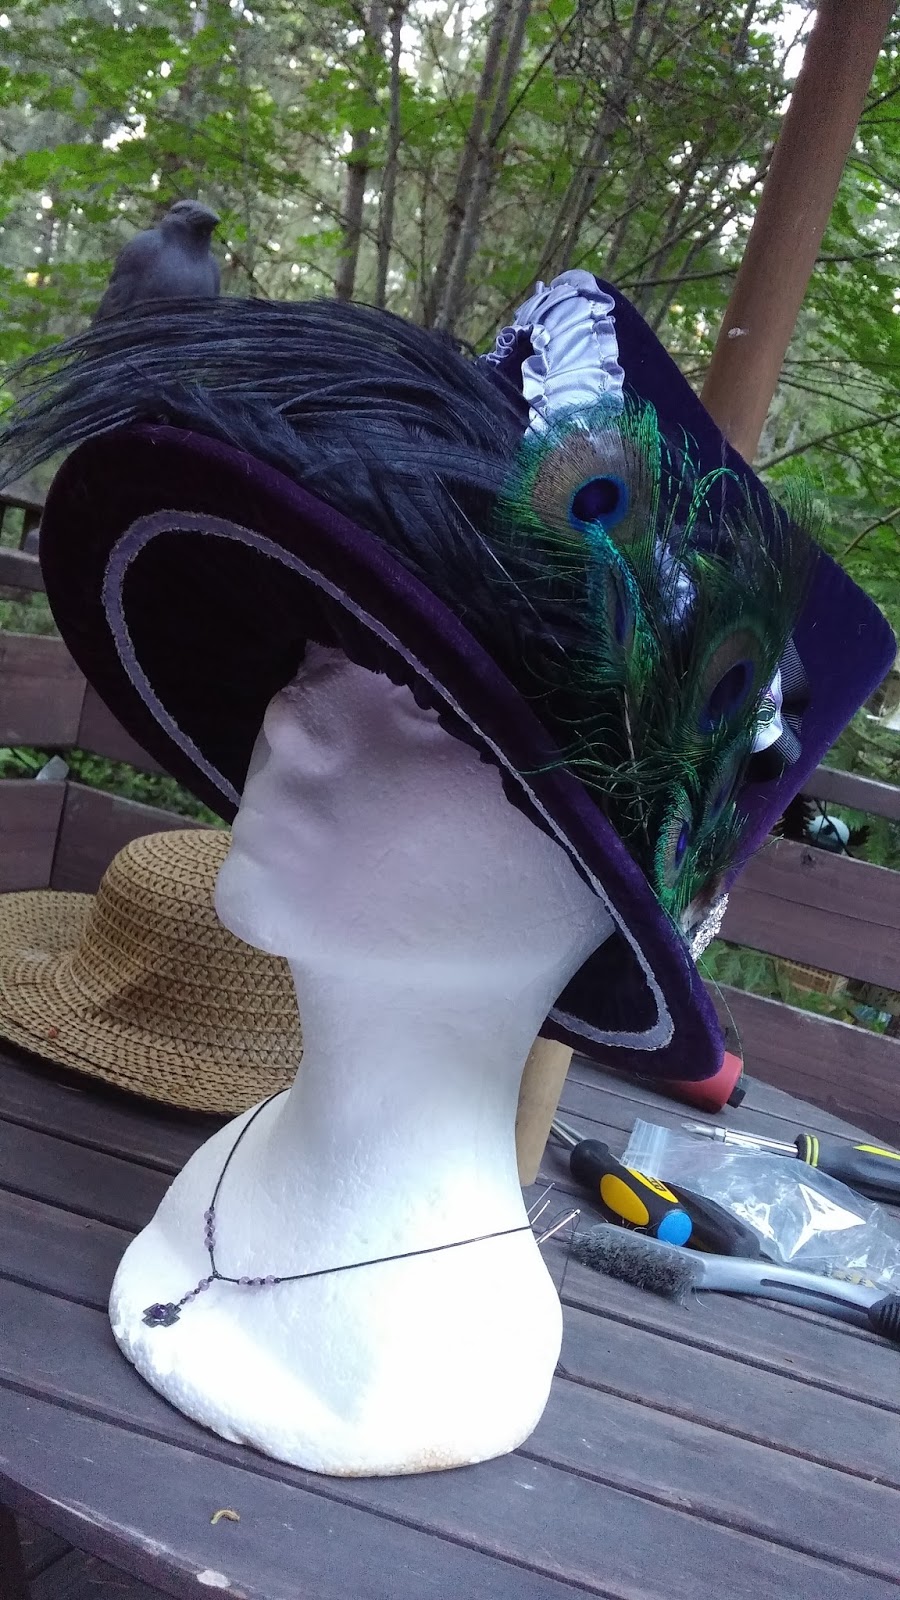
A Velvet Bonnet for Agnes
My bonnet-pattern testing phase is still going, although often interrupted by other things. I was blazing away on this project when mom died, so I've only just gotten back to finishing it. One of my friends from the ORS (she now leads in the WRS group) asked that I make her a bonnet/hat with a triangular top. She asked me this eons ago when I made another one that ended up being super small. She sent me all the supplies for covering and decorating, and it idled on top of my bedroom closet for months.
But finally, when I made the capote bonnet, I decided since I had everything else out, I would go ahead and design this bonnet for her.


Then it was just a matter of covering and decorating it. Agnes sent me some velvet, some moire ribbon that was really wide, some pale slate blue ribbon, an assortment of feathers, and some embroidered thistles. I tried to use everything in a tasteful way.
But finally, when I made the capote bonnet, I decided since I had everything else out, I would go ahead and design this bonnet for her.
 |
| The basic frame, assembled. I started with a paper mock up, then a poster-board model. I used that to cut the buckram. I wired both ends of the pipe and the outer edge of the brim. I then shaped the wire into a triangle. Carefully. |
 |
| I cut the top cap accordingly. Don't mind the small photo-bomber. |

 |
| It's a little big on the head, which is a good thing. The last one barely fit her, so that was a problem. LOL. |
 |
| I put bias tape on the edge of the brim and the top of the hat to avoid any unsightly wire eventually wearing through. |

 |
| I hand sewed everything, but for this part, I did cheat and used rubber cement to affix it there. Sue me. |
 |
| I then added mulling. I whip stitched most of it in place. I lined the outer bonnet. |
I made the feathers into a separate bundle with a ribbon base that can be pinned to the hat, or removed as desired. There is a lovely black ostrich feather, and several small peacock feathers.
I made some cockades wherein I added little pouffes made from the embroidered thistle.
The most time-consuming bit was the line on the inside of the brim. It is a line of the same ribbon, which frayed. I then stitched a little silver border along both sides to neaten it up. The silver is also repeated in the ruched ribbon chevron on the front of the bonnet.


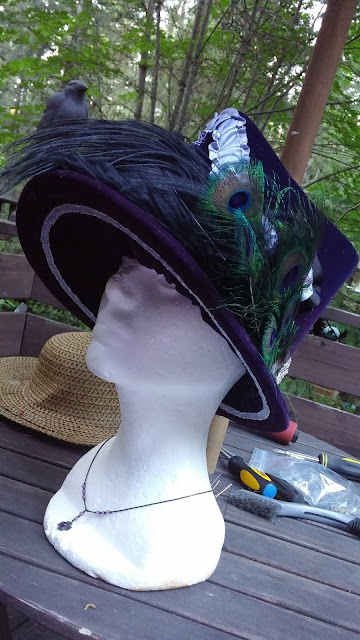
All in all, I think it's a lovely bonnet. I kept it simpler, because it is the kind of bonnet you want to add stuff to. I hope Agnes likes it. She waited long enough for it. Sorry Agnes. :) I think this pattern is a win. I might do several top-shape options on it, as well as a variety of brim-styles.


 |
| If I hadn't run out of the blue riboon, I might have taken the ruching all the way 'round the back between the two cockades too. |

 |
| You can see, the feathers can be removed. |
 |
| It's difficult to see, but the inner brim is ruched. I lined the inside of the hat with the wide moire ribbon, which is black. |
Friday, November 15, 2013
The round gown, professional photos


Models: Robyn Wodiuk, Breck Warren.
Makeup and hair: Morgan Shanafelt
Location: Timberline Lodge
Copyright © Stephanie L. Johanesen - The Hungarican Chick, 2014, All Rights Reserved. No part of this website or images thereon may be reproduced without Stephanie L. Johanesen's express consent. Backlinks are permitted.
Sunday, November 10, 2013
'Round and 'round the round gown.
I had a photo shoot set up for a book-cover project on Friday, which occurred without much trouble (only a small episode of the photographer getting stuck in the snow just at the foot of Timberline lodge, so we started a bit late, but it didn't deprive us of exactly the lighting we needed for the shoot, and we played with poses and ideas and light for about two and a half hours with our beautiful models in Regency costume in the middle of a bustling ski lodge.
Timberline has good lighting. It has 'castle' lighting. The lighting of a great house. Dark and cavernous with bright, stark white light that pours in from vast windows, and reflects off the rustic surfaces. The photos (when they come in from the photographer, I will post some samples. The colours and light have such a beautiful old-world oil like quality, which is just what the object was.
For this shoot, I found a little model off of craigslist... a darling befreckled beauty named Robyn, who was absolutely perfect. petite, dark hair, clear light eyes and the sweetest, darling face. She was soft-spoken and just plain adorable. I made for her one of my famous 'LWG's (Little white gowns), but instead of a bib front, I decided to make a round gown from the same pattern. And here are some of the lower-quality images of Robyn in her finery.
 |
| Robyn's hair and makeup is completed, we retreated to the baby's room so she could put on the silk clocked stockings I ordered from American Duchess. |
 |
| This photoshoot turned into a domino-effect of costume cobblery. I made the gown first, and seeing that it didn't work with a standard push-up bra (the edges showed in the neckline), I ended up having to make a bodice petticoat and a chemise as well. I used the S&S short stays pattern, but added a skirt to the bottom. |
 |
| The neckline is very delicate. I added a strip of sheer to the edge of the gown's inner neckline and switched out the short sleeves from the pattern with some quickly draped sheer sleeves instead. I like the little train. :) |
 |
| I used a cheap poly net. This gown is no nod to period-correctness really, but it was completely hand-stitched. |
 |
| Some free-form shots taken in the light of the snowy exterior. Robyn and Breck are working the Regency thing. |
 |
| The lighting was so perfect. My phone camera just didn't capture it very well. |
 |
| Gazing longingly out the windows. |
 |
| We moved some of the heavy lodge furniture to take our shots. |
 |
| The modern rug and drapes will be edited out if needed. |
 |
| Are they not so very sweet? |
 |
| Sorry for the bad quality. The photographer was getting much better images than I, obviously. |
As for my gown last night, I made it from stash materials. A set of IKEA black window sheers ($20 for about eight yards) and some fabric I had purchased for a bridesmaid's dress that was never used. I layered the light blue fabric beneath the sheer and hand-stitched the whole thing.
 |
| I added long sleeves to hide my hams. Notice how one breast is bigger than the other. The perils of breastfeeding. LOL. My feather also decided to lop down to the side, it was rising up and arching over my head at some point. The Lady of Portland House is the little doll-creature beside me with the spectacular hair. |
 |
| The back. |
 |
| I usually don't photograph well, but I like this photo. The only bad thing is the way my stays and petticoat strap slipped. Grr. |
I draped the pattern for this gown on my duct tape double made at the coast. I will also use it to drape my short robe I intend to make for the tea in December. It's a drawstring round gown embellished with black lace. Simple, but very cool with the undertone. I kept the inner gown hemmed to the top of my foot, but the black skirts have a slight train. Jewelry is a tiara I found at Goodwill, and a necklace given to me by a friend. My earring holes have closed, so I can't do earrings right now. but I will get them reopened eventually. Anyway, I'll do a more detailed post on both round gowns soon.
Subscribe to:
Posts (Atom)
LinkWithin
