
NEW UPDATE: June 22, 2013 -- I have created a pattern for this gown (finally) which is available for sale. The pattern is $8.50 -- it can be downloaded and printed at a local Kinko's for about three dollars. Download includes the large-format pattern, plus instruction sheets on normal 8.5x11 paper. You can download it from the margin widgets to the right, or scroll down to the bottom of this page where the widget has been added.
 Happy Friday all! I noticed I tend to keep most of my Regency, millinery and sewing posts limited to the Oregon Regency Society's blogspot page or the RSA Community Board. So today, I thought I'd just post my ode to the Regency Bib-Front gown on my own blog today. It's a happy Friday, and I posted a HUGE post on men's Regency costume on the ORS blog yesterday anyway.
I digress...
I am a great fan of the regency bib-front gown (sometimes called stomacher gown, drop-front, or fall-front gown). I find myself often making gowns last-minute for friends; and invariably, because of time constraints and trying to size something to someone who isn’t present, I opt for the bib-front. It's usually a situation where I can't have that person standing around for a fitting, so I make the gown that will most likely mold itself to fit her.
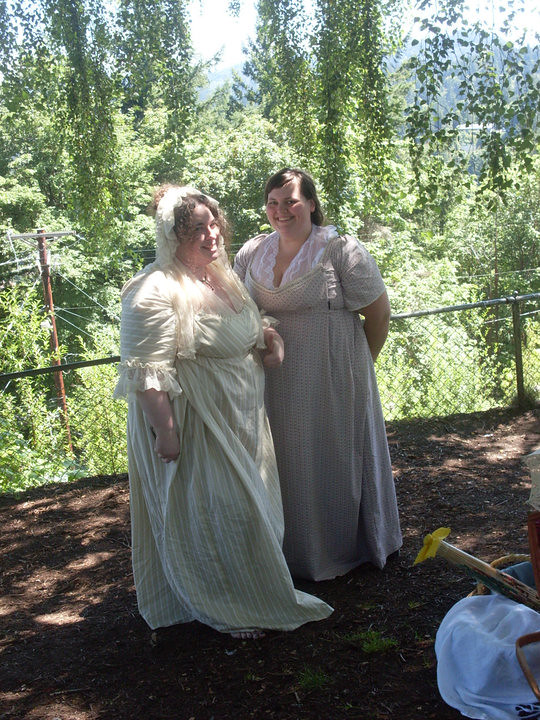
Additionally, the beauty of the Regency bib-front is that if you are not overly-endowed in the breast-department, and your gown and bib is sturdily made, you do not need to wear any **confining underpinnings of the period to obtain the proper Regency silhouette. The reason why, is because the gown has a drawstring that goes around the empire waistline, and is held in place by two loops on the back. The bib then lifts up your girls, and if it's pinned or buttoned and shaped right, it will hold them comfortably in place. I don't think this will work well with anyone larger than a C cup, but all of the ladies below are wearing standard push-up bras underneath their gowns and that's it. WARNING: If you are C-cup or over, you will very likely need a set of Regency period stays/corset. There are no two ways about it. I will post this embarrasing photo of myself this summer when I decided to wear a gown without stays: Here it is, I am on the left. ::facepalm:: It was necessary to post this humiliating picture to show you the pitfalls of not wearing proper underpinnings. My gown looks like a tent and I am just drooping horribly in it. As a contrast, Stephanie II on the right is wearing her transitional stays and she looks perfectly fine. Both gowns are bib-fronts. **follow the 'confining underpinnings' link for a summary of the period stays and patterns. UPDATE: 3/23/11: Also, for a detail on regency undergarments click here. This will give you an idea of what you're supposed to be wearing underneath your bib-front.
 |
| As you can see, the back closes in front like a little jacket. The bib and front skirt panel are then tied to hide the jacket closures. |
 |
Creating two loops at the base of the back, on each seam helps keep the ties in place.
ends should be tied in a bow, and tucked under the skirt front panel |
 I have a couple of purchased bib-front patterns, but I barely use them except for when I want to vary the sleeves or I have to change sizes. Instead, I have a home-made Frankenstein pattern I have made from the Janet Arnold regency gown back (which I love for its narrowness) and a manually-adjusted side-front piece cut from one bad pattern, and then altered from my muslin to become the piece I use in general. It’s from this bodice—
I drew my adjustments directly on it and then cut the muslin itself to act as the new piece. Here is a video I made back then about it. That very drawn-on piece of the side front is what I use today.
This pattern of mine is comprised of three pieces; a short sleeve that I often use and customized from a longer one, the back and the side front muslin piece. Those are the only things I cut from the pattern… the rest I improvise.
Of course, I am sort of limited in sizing, because I have no knowledge of upsizing or downsizing patterns, however I have added a little width to the back, and a little length to the arm piece to go up a size but that’s about it.
The beauty of this gown is that there is only one crucial fit, and that is the back width—and if your armseyes are good, and your front panels can be tightened, and if your wearer can put on the bodice like a jacket somewhat comfortably, then it will fit them. The bib front allows for A LOT of flexibility when it comes to breast-size and the variation in chest-circumference. The one dress pattern I have fits from about size 6-10. But what’s also amazing is that I used the same size for Sherry’s dress and for Tessa; Sherry has about a moderate B cup. Tessa is at least a D. Look how differently both girls are shaped… and then look how well the dress fits them.


Seriously. It’s an amazing gown. I make it CONSTANTLY and I’ve pared down construction time to ~ four hours depending on how intricate it is. MIND YOU, these are not historically accurate pieces because I cut corners and machine sew everything, but it is pretty and authentic looking and very practical. I don’t bother to cover the waist seam inside by whip-stitching the lining over it or such things… but you could if you wanted to. I did with my very first bib-front project; my green gown, which I draped entirely on my duct-tape mannequin. I used no pattern on this one, but made my own.

 |
| Updated image (I've lost weight in this picture), the gown fits just fine in spite of going down 2 sizes. |

 |
| Construction of the bodice. The back piece was designed after an extant gown. |
What’s really great is that if this gown is made in white muslin, it can be used for day or evening; washed, bleached and trimmed to your liking. Sick of a white gown? Just dye it. You can make overlays for it out of net or silk or velvet… pelisses, spencers, half robes and robes… or use the same pattern to make sheer gown overlays. It truly is the essential ‘little white dress’ of a regency wardrobe. I tell those who I make gowns for to get me 7-8 yards of muslin (yes, I cram at LEAST six yards of fabric into that skirt… but it’s not necessary. 5 yards total would probably suffice. I knife-pleat a most of it into the back to create that beautiful volume. If you saw it move and flare, you’d understand.
 |
| See? |
Because the bib is so non-crucial to the fit, I can really play around with it creatively—I even created a crossover front on one (see pics). All I do is cut two sets of each piece (2 backs, four side-fronts—only 2 sleeves, I don’t line the sleeve). I sew each set into a separate bodice, then lay them good-sides together, sew the whole neckline, from the bottom of one front flap to the other. I turn it inside out, press and then proceed to add on the sleeves of my choice. Then I just start attaching the skirt. I don’t ever bother to cut shaped skirts. I’m a great fan of the basic ‘round gown’, which is basically wide tube of fabric pleated up to the back of the gown. You can work in a train pretty easily with a simple ‘slow’ angle cut.

The skirt is an exercise in simplicity. Open up the fabric to its full width, sew the short ends together and make a big tube. First thing you do is fold it so the seam is on one of the ends; and that becomes the skirt back. For the length of the skirt, you measure from the chest line (under the breasts) to the top of the foot, and then cut your tube to the desired length; making sure the bottom is an uncut selvage if possible (so you don’t have to hem! Genius (or lazy?)!). Or, if you have to hem, do it before you close the fabric into a tube; you won’t have to worry about it later. Any variations you make to the length, train etc, happens at the top of the skirt.

Then while still folded and after you’ve done your length cut, I cut an 18” slit to about 6-8” in from the top front edge of skirt to create front flap panel. I turn in the edges on the slit and sew them down. I then attach a 3-yard length of white twill to the top edge of the panel—making sure I add in two symmetrical box-pleats to add some give and interest to the front of the skirt/bib-panel.
[Update, 2-15-2012]: It was requested that I explain in better detail how the skirts are pleated onto the bodice, and until I actually have the ability to make a decent video of my efforts, I decided to do a paper mock-up to show you how I do the skirts. So there are these silly little movies. Maybe they'll help you better visualize what I do when I'm making a simple round-gown.
Then you cut your bib on the bias… make it pretty, make it plain… play with the shape, give it a V neck… whatever. Add buttonholes to the top corners and then center it on the front skirt panel, sew it on and lo and behold… your front is done.
 |
| Some ideas for your bib or stomacher. |


 The back is the most challenging bit. You start by pinning the other edge of the slit to the bodice front panels; starting at least 6” in (depending your size… you will have to try on your bodice and figure out what works best on you… you want the side of the gown to hang just below your breast. You start pinning it down the bodice all the way around to the seam of back piece. Then comes the intensive process of pinning your knife-pleats. It’s also a treacherous sew on your machine; so have extra needles on hand!. Once you’ve done that… attach a couple of loops on the outside of the gown just at the bottom of the back seams where the skirt meets the bodice so you can thread your drawstrings through (or you can also sew a channel to the inside to lace your twill drawstrings through if you want to hide the ties) and voila… You’ve got a gown. Trim away. Most of the ladies I’ve made these for have opted to keep these gowns simple and to trim with a coloured ribbon at the waistline. I’ve done some marginal decoration on the bibs, but you can really glitz up a gown like this very easily.
Any regency gown pattern can be modified into a bib; the ‘mock bib gown’ in the Mode Bagatelle pattern takes very little modification to turn it into a real one. You just cut your backs on the fold so there’s no opening, and then cut the neckline wider, and split the front to make the ‘jacket’ part of your bib gown. It’s pretty easy and makes for a really versatile gown. I don’t think I would ever go with a back closing gown again.
Update 11/12/13 - Here are some pictures of my bib-front pattern being used to make a round-gown, an easy conversion. The sleeve pattern is not used in this example because I draped the sleeve, I wanted a full-length sleeve in sheer to enhance it. Also, I added a 2" strip of sheer around the neckline with a drawstring to add some interest to the gown. It's a simple pattern, but makes for a beautiful, dramatic gown. Instructions for the round gown are included with the patter (if the instructions aren't clear enough, let me know).


Update 11/12/13 - Here are some pictures of my bib-front pattern being used to make a round-gown, an easy conversion. The sleeve pattern is not used in this example because I draped the sleeve, I wanted a full-length sleeve in sheer to enhance it. Also, I added a 2" strip of sheer around the neckline with a drawstring to add some interest to the gown. It's a simple pattern, but makes for a beautiful, dramatic gown. Instructions for the round gown are included with the patter (if the instructions aren't clear enough, let me know).


RECOMMENDED FABRICS & QUANTITIES
_______________________________________________________________________________
For any regency gown, I always say go natural and go light. Also, go classy, NO huge prints, no victorian flower extravaganzas, lines in tasteful pattern.
For a day gown, look for: solids, small-print, roll print, small-dotted or subtle plaid cottons, white or solid coloured muslin. Sheer fabrics (above mentioned types) should be worn over a white cotton petticoat for opacity or doubled up with a coloured underdress. Fabric types: muslin (thick or sheer), lawn, batiste, cotton. I do not recommend synthetics with high-sheen or slippy, strange texture. Linen is fine as well, and even a light wool for a wintry gown.
Evening wear: Silk with decorated embellishments, voile or cotton sheers over coloured bases, subtle textures like embroidered dots or flowers. Some vegans don't use silk (although the pollution of the manufacture of synthetics could arguably be worse than the death of silk-worms, but it's all relative)... anyway, you can find some tastefully synthetic fabrics (non-shiny taffetas, other faux-silks).
Possible addition of a robe in velvet or silk to enhance a white sheer gown.
Yardage: As I said before, you can go with as little as five yards, or you can go crazy and put eight into your gown. But a nice, short-sleeved gown with a tiny bodice and reasonably nice skirts can easily be accomplished up to size 22 with five yards minimum.
_______________________________________________________________________________
PATTERNS AND LINKS:
For good measure, I have decided to add links to some bib-front patterns:
* Patterns of Fashion, Janet Arnold (scalable patterns)
* Reconstructing History Patterns:
Update: 3/2011 ~ I've been meaning to add in Katherine's little video on how to put on a bib-front. She is tying the ties INSIDE the gown, but that's how she chooses to do it--it doesn't pin down the waistline as well that way, but she's so skinny it doesn't matter. :) This video is precious, as is she.
 |
| The Drawstring V-Neck gown (Tutorial Link Below) |
Update: September 14, 2011
I've also added a tutorial on how to do the draw-string V-neck gown that I wore for the July 2011 Pittock Mansion Picnic. You can read about it on this post.
Buy the Bib-Front Pattern Here:


37 comments:
This is an awesome tutorial on bib front gowns! Thank you so much! I'm going to use it to convince all my friends who think that using modern Simplicity and Butterick 'Regency' style gowns instead of going historical that they are wrong!
And I love all the back pleating.
I am revealing the depth of my costume geekery by saying this, but when I see all that fabric pleated so beautifully, flaring out when they dance... I get chills. ::heheh:: The thing is, they're SO easy to make once you get how they work... I wish people weren't so daunted. The Butterick-style patterns are harder and wasteful in fabric because they require you to cut shaped (an in the case of the butterick gown--badly shaped and lacking any gathering pleating at all--the skirts are an ugly tube!) skirts...
This is sooo weird! I was just looking at your pics of this yesterday to see it I could figure out how to turn my la mode pattern into a true bib front. It's like you're reading my mind! Thanks and I might hit ya up if I run into issues in converting that one. Although these are awesome instructions too.
Great post!
LOVE these dresses--especially the back! Which Janet Arnold illustration did you use for the skirt?
I meant, which Janet Arnold illustration did you use for the back bodice?
I used the 'Morning gown' pattern piece.
Those are such beautiful dresses! You've inspired me! Do you think this is something a beginner can do? I want to try using Janet Arnold's morning gown for the bodice (I like it best out of all the ones I've seen). I have never tried to copy a pattern from a book, is it possible for a beginner to do? I'd also like to use sense and sensibility's sleeve pattern with it and I'm wondering if I'd have to adjust the armscye for that etc.... I'm really hoping that this is something I can do as I'd love to have a dress like this.
@Anon
It's a somewhat convoluted project but I don't think it's completely impossible for a beginner. I am no seamstress by any means, and my sewing skills are mediocre at best. It's worth trying, but I would definitely pin, try and fix before committing to a full stitching. :)
As for the sleeves, the glory of regency gowns is you can mix and match. You should have no problem blending in the S&S sleeves to fit the arms of the bodice. Some gown patterns have it designed so that the sleeve seam meets the seam on the back, but it isn't crucial. Just pin the underarm part first, and then gather or pleat the the shoulders to the bodice/
Gorgeous inspiration! My sisters and I are planning to attend the Louisville, KY Jane Austen Festival. I'll need to make a dress, and I'm not all that when it comes to sewing. Still, I think I can manage. May I ask what fabric you use, and where you get it? My sisters are making theirs out of quilt fabric, which seems a little stiff to me. I was thinking something light and flowy would be bettery. Let me know your thoughts. I want my dress to be perty :-)
Hi Shiela,
For something light and flowy, I recommend you use at least a handkerchief-weight cotton or lighter. For these LWGs I make for people, i use the inexpensive muslin and the gowns are never more than $20 -$25. But if you really want something light and flowy, I'd try and find some reasonably priced Voile or Batiste. You can get voile at a great price from Dharma Trading; like this: http://www.dharmatrading.com/html/eng/9491884-AA.shtml?lnav=fabric_cotton.html
You MUST have underpinnings of course, including a petticoat. Here's a post on the Oregon Regency Society page I wrote about regency underpinnings: http://oregonregency.blogspot.com/2011/03/undressing-regency-lady.html. There is a description of an easy petticoat.
I adore the bib front dress you have on your blog. I have to make a dress for a Jane Austen festival coming up this summer, and I want THIS ONE - hahaha. I am not a terribly experienced seamstress but I am willing to take a stab at it. I bought the period impressions pattern, but it gathers in the back instead of using pleats like yours. I simply have to have a skirt as graceful/beautiful as the ones on your blog. Have you ever thought about posting a video on how to make this dress, or at least the skirt (and then attaching it!)? I tried looking at your instructions, but again, I am too experienced to understand.
SHEILA --- 3riversgirl at gmail dot com
Okay, I've seen and heard of this duct-tape mannequin... Are we going to get to see a how-to on making one? All other mannequins have the wrong silhouette, and I don't have a sewing buddy (and am a very intermediate seamstress, so fitting is my biggest challenge!)
Thank you so much for this post. I finally finished my regency gown with your instructions!
This is a great tutorial, thank you! Also, I was wondering, have you ever made the Elegant Lady's Closet pattern? The drawstring dress has a lining similar to this one. I'm wondering if I can use the lining from that pattern as the lining for a bib front and skip having to draft it myself. Thanks!
Fabulous!! Thank you for writing this post. Brilliant! -Nicole
Dear me! Oh dear le, I never thought I'd found such a detailed tutorial for this very dress I have been looking for... I don't know you dear stranger but please know that I love you very much and hope all the best for you and yours !!!
If only the internet could be full of people like you, it'd be wonderful...
Great information! I am just thinking about making a dress like this. I think you just made up my mind that I will! I need something to work in that isn't really hot. Menopause is not treating me well! Thanks a lot, I am sure I will be back to this page often as I start work on my dress!
Great post. I'm very tempted to have a go at making a bib front gown for the JA festival in bath next year. (I just used a commercial pattern last time).
I was just wondering instead of making a slit in the front of the skirt it would be ok to just leave top of skirt side seams unstitched?
I'm thinking of doing a pin tucke bodice bib.
what closures would you reccommend for the bodice under the bib? Buttons? Hook and eye?
Such a beautiful dress pattern. I bought it and only got the instruction sheets with a page of all pattern pieces on a letter size page.
I did not get the Large-scale pattern, like you said up in your blog. I'm sure it was just a computer glitch or whatever, so would you please send me the full size pattern pieces that would come with the purchase of the Regency bib-front pattern. I have the instructions and the small-page pattern pieces. 6 pdf pages in all. Just not the real pattern. I beg of you..I REALLY want to make this dress. Well more than one of it. I got started on my this-year-Jane-Austen-Festival_wardrobe in Louisvile, KY..and I REALLY need the REAL pattern. Thank you kindly
Such pretty dresses!
I was going to buy your bib-front pattern but I saw it's only sized 6-10. Any chance you could make a larger one? I'm more like 18-20. :(
Emma, I do not have this particular pattern in larger size because I am just not equipped to scale it properly. I don't have that expertise. All of my patterns are amateur patterns. However, Laughing Moon just came out with a brand new bib front pattern that goes from a 6 to a 36, so I recommend you give that a try. It looks really well designed, with lots of bib and sleeve options. http://www.lafnmoon.com/product_p/p126.htm
Can you make this without lining, and then put a separate chemise underneath. My Fabric is see-through, I have several gown and would like to use one chemise.
Elaine
Absolutely. Just roll the edges and French the seams.
How do you pattern the longer sleeves? I made the bodice with the sleeves as directed but they were too confining so I used the long sleeve pattern from my La Mode Bagatelle envelope. It looks adorable so far (still working on the skirt and doing it all by hand) but I was wondering if there's a way to extend the sleeve piece in the pattern I got from you.
I have found drafting sleeves to be rather simple once you get the hang of it. I get a large paper and draft out my design with the seam closing on the underside of my arm. I draw out the shape using measurements of my armcye to provide an initial width for the top shoulder. And I taper it down based on the width needed for the trunk of my arm to elbow length, and the width for my lower arm and cuff for wrist length as preferred. Mark the placement of the top of your shoulder and the your underarm shops fall at the seam. Account for any fullness you want in the shoulder by adding a wedge of fullness to the shoulder width. Plus measure in from the back shoulder to the peak where the sleeve comes into the back on this particular pattern. It means only adding a little more length to gather up into those little triangles where the back and shoulder seams meet. It's best to do a muslin first of course. But once you nail the right fit you can use it for anything. I am sure there are better ways to do it than this But I've always learned by doing and this works for me. I prefer gowns with mid sleeves or wrist long sleeves myself with minimal pouf, so I have been forced to manage on my own since I find patterns don't often match my hammy arms or my aesthetic.
I will upload a video better explaining this on the blog.
nice blog..
xclusiveoffer.com
Wedding is very special day for the bride as well as the bridesmaids as to choose the most beautiful bridesmaid dresses or choosing Peach and one shoulder bridesmaid dresses for them to make sparkling. It differs according to the situation of the wedding site but don’t worry, our customer service will guide to satisfy you until you’re for ultimate perfection. For more information visit now !
Bridesmaid Dresses
If you are looking a best and affordable Bridesmaid Dress shop in Walnut Creek CA . Visit our website and get best and stylish Bridesmaid dress at very chef price.
Bridesmaid Dress Shop
We have unique and stylish prom dress collection. Visit our store in Walnut Creek CA and get best prom dress at very chef price. For more details fell free call us 9259431505 and visit our website.
Men’s Suits Shop in Walnut Creek CA
I just finished the gown! I used McCall's M7493 as a starting point...your directions were awesome! I'd love to send you pics of it..
.can you contact me via email? Thank you so much!
You are truly amazing! I have purchased your pattern however as Im from the UK don't know what the large print stand for :/ Can you please help me out so I can print and saw. Much appreciated. Petra
Update. I have managed to print it. Thank you
I unsubscribed but I'm still getting notifications on this article. Please delete me if you can! Thanks much.
please take me off this list. I unsubscribed and I'm still getting emails when you get a comment. Thanks, Leslee.s.gill@gmail.com
Sue. I actually bought a bib front dress unknowingly. It certainly had me baffled as it was laced and boned at the front like a corset. It took me 1/2 hour to figure out how to get it on. The finished effect was lovely.
Post a Comment