Tuesday, August 30, 2011

Monkehs

My dearest BFF, the young and talented bakerella Stephanie R (also known as S-II or Stephanus Divine) was again in need of some more permanent cake toppers for another cake-project. These could easily be made of gum paste or whatever, but that would make them impermanent. Although the Sculpey does show my fingerprints more aptly than edible media, and isn't quite as shiny, these little guys ought to last a good long time after the birthday cake has come and gone. This customer wanted monkeys with blankets and bottles. So she got monkeys with blankets and bottles. :)


I will add photos of the finished cake if/when S-II provides them.

Next up? Turtles and butterflies. Possibly tonight. We shall see.

Monday, August 29, 2011

Talk about incentive, huh?


Miss Pomme-de-FatAss
My dressage saddle had been languishing at a consignment shop in North Portland for months. Nobody is spending money, and I’m sure if I’d put it on ebay I would not get at all what the saddle is worth. It’s a good saddle. But my butt has grown too voluminous for it (it’s already too big for my all-purpose saddle) and it’s time I got rid of it. I don’t compete anymore, nor do I bother with the mussy fuss of dressage anymore (I’d probably get kicked out of competition anyway ‘cause I’m too fat!).

Yeah, I’m on a ‘I hate me’ bender. I’ve been vacillating between 24 and 27 lbs lost for four weeks straight, in spite of following the rules food-wise. Really irritating. And here I was thinking, hey, I’m doing great, I’m losing weight... until YESTERDAY. Yesterday, a pile of us from the barn threw our horses into a little convoy of trailers and went up to a park where we could do some trail riding. While I waited for the slower folks to get ready, Tag and I decided to take a nice little walk around the large arena they have set up there. Unfortunately for me, one of the rider’s mom had a camera and she took a picture of me.

I confess, this picture has been the cause of one of my worst cases of demoralization I have had yet. I look like a potato. I feel like I haven’t made any progress at all! I have a huge double chin, my thighs are HUGE and I’m so wide!!! On top of that, a lady asked me what kind of saddle I had, and when I told her, she told me it was too small for me. I’ve had this saddle for over 20 years. Yeah, my ass has expanded significantly since I got it, but it still felt like she punched her fist through my chest and ripped my heart out. OF COURSE IT’S SMALL... MY BUTT IS GIGANTIC! ::facepalm::

Of course, I saw that picture after the trail ride, so I managed to have a decent time regardless, and at least Tag looked handsome. As usual, he was complimented by so many passers-by. He’s my baby boo. I’m sorry he has to haul my massiveness around sometimes, even if he is strong enough to carry three of me—I still feel bad.


L-R: Nicole walking her horse like a big dog, Cozy, Emily, Danielle and...
Um.. Nicole's mom (always forget her name)
Anyway... So this really serendipitous opportunity came up. I was googling around and found a wide-tree sidesaddle with a largish seat (for Mrs. Potato), and the asking price was exactly what I am asking for my dressage saddle. So I ventured a risk and asked the seller if she would be willing to trade for another saddle of the same value.


She asked me quickly what kind of saddle, and I told her a nice black German dressage saddle, and I could almost hear her squees across the country. So the deal was made and our saddles are wending their way across the country to one another. I’ll still need to buy a balancing girth, and Tag doesn’t know squat about crop-aids, but since I’m so damned fat, and my legs won’t fit into the saddle yet anyway, it will give me time to get my ‘kit’ together and to start planning for the habit and whatnot.

It’s been twenty years since I’ve ridden sidesaddle. This is going to be interesting. ::Hah::  Anyway.. a horsey update.

Potato-woman.

Friday, August 19, 2011

Eleven practical uses for teenagers (Happy Friday!)

There is an awkward stage of human growth that occurs during the transition from wide-eyed adorableness and tiny voices to full-on adulthood. It’s called the teen years, and it’s one of the darker stages in the human development where the individual, over several years, is rendered utterly useless to humanity.

It’s a stage many of us look back on with cringing shame, and wonder how we made it through alive. Although not fully documented in all its bleakness (because most of humanity prefers to forget they ever went through it), the teen stage is a tumultuous, obnoxious and utterly intolerable stage, where the individual becomes a useless drain on society and their family for a period of several years.

The typical behaviours and symptoms of this stage include: wild hormonal tantrums, knowing it all, snide retorts, disrespectful entitlement, utter obliviousness to others, a complete lack of consideration, self-absorption beyond what was thought to be possible in human beings, voracious eating, costly care, bad hygiene, complete shutdown of gray-matter functions, completely insane decision-making, refusal of responsibility of any kind, greediness, materialism, laziness, stupidity (which can be also attributed to Natural Selection), self-righteousness, affinity for dramatics, a complete lapse in taste in clothes, music, and everything else and much more. Some individuals manage to scrape their way through the teen years still clinging to their dignity, but on the most part, most teenaged individuals are just completely useless wastes of space until they grow out of it.

But, since this is a common stage of human development, we are all unfortunately saddled with the burden of having to deal with these individuals as they go through this miserable stage of temporary devolution while they revert for a short period to the more ape-like tendencies of our simian ancestors; I have created this list of uses for teenagers and pre-teens that could make the obligation of enduring their presence in our society a smidge more tolerable.


1. Flood Control
  Stacking teenagers and pre-teens up like sandbags is a fast and effective way to prevent floodwaters from deluging your community.


2. Peacekeeping
 Air-drop a few legions of teenagers into any country with political strife and war. The whining, temper tantrums, ‘I wants’, unmotivated rage, laziness, entitled outbursts and smug retorts will be enough to send any armed faction or insurgents to drop their weapons and to flee in horror back to their villages.


3. Speed Bumps
 Speeders are a problem in many of our communities. There are plenty of spare teens around to solve this problem.


4. Scarecrows
 This is a most appropriate use for a teenager. Already dressed in horrible, saggy fashions, or overflowing muffin-tops, the teen won’t even know they’re serving a useful purpose. Give them an iPhone or a PSP, and they’ll remain tied to the post with little resistance.

5. Ballast


6. Punching Bags


7. Scientific Experimentation

8. Demolition
 A teenager’s natural ability for destruction is ideal when something needs to be rendered into a ruin, such as office buildings or old factories. Just set a few of them loose on the property for about three hours and they will invariably demolish the place.


9. Man-made coral reefs
 This would be killing several birds with one stone, both lightening the world's teen-burden, but also helping rejuvenate our struggling ocean ecosystems.


10. Instant Bridges for Distasters and Emergencies

11. Fill
  
As you can see, I've put some careful thought into practical uses for what is normally a completely useless yet far too abundant resource.  It surely would serve us better than simply allowing them to roam freely at malls, spend all day playing WOW or take up couch-space in front of the gaming console.

Monday, August 15, 2011

The Wonderful Annoy-a-tron.


So last week, my coworker Sherry came back from a two-week vacation. Before that, my husband had ordered a little device from ThinkGeek called ‘The Annoy-a-Tron’. Now ThinkGeek has a blinding array of wonderful items to make your friends, family and coworkers insane with, but this simple $12 item was just what was needed to turn someone who likes order into a madwoman.

This little device makes noises. You have a choice of six noises on this particular model: a tiny little beep, a doorbell, a cricket, a high-pitched beep only I could hear (maybe bats and dolphins and dogs too), and another high-pitched beep that everyone could hear. There’s a little option on the slider where you can choose random, and it will play them all.

This clever little device (which looks much like some sort of surveillance device) has a little magnet on it so you can just plink it onto the nearest metal office furniture, make sure your volume is set at an optimal level, and let it do its work.

So, that Monday, as soon as my coworker stepped out, I took the little Annoy-a-Tron, and put it up on the fluorescent light ballast behind her desk, facing away towards the wall. This made the sound bounce all over the office. I set it to random at first, and then went back into my office. About five minutes went by when I heard the doorbell from my office and it was REALLY LOUD. So I went back in, took it down and adjusted the volume, and stuck it back up there.

My coworker came back and I sat in my office wringing my hands with a malevolent grin on my face. But nothing happened. It was really irritating. Lucky for me, she had to run out again, so I rushed in to see if I’d accidentally turned it off. It was on, but the solder weld on the battery casing had popped loose, probably from the heat of the ballast. I had to hastily pin it down with a binder clip, checked the volume and put it back up there. Little did I know, I’d set it to the first faint beep... but it turns out that it was enough.

For the first hour, she was so busy she didn’t notice, we even went in there a few times to confer, and heard it go off, but she didn’t notice. We (my other co-worker and I) could hardly keep a straight face. It would go off about every five to eight minutes. But then later on that afternoon, after my other coworker left and it got quieter in the office, I heard: “What the hell *is* that? It’s driving me crazy!” Then I heard that same exclamation like six more times. Then, I heard her test the smoke-detector in her office. Biting back the snickers was almost impossible. You have to understand that Sherry is a student of order... something she cannot fix or prepare for would make her nuts, and that beep made her insane within the first hour of actually hearing it.

But because my other coworker had left, I didn’t want to tell Sherry about the prank yet. I figured we’d *both* share in the delight of her reaction. I also figured she wasn’t going to stay at work much longer (which, little did I know, she did anyway to try and figure out where the source of the beep was. She moved around her office for half an hour, listening). I went home giggling, and then promptly forgot about it.

The next morning, I came in, and she had the back door of her office closed (which is a door to our little laboratory). Again, I’d forgotten about the prank, and as soon as I came in there she was, holding some grey box with random equipment in it, looking visibly frazzled. “I’m keeping this door shut because I’ve been moving equipment out of the office one at a time. Every time I hear that damned beep, I know the beeping thing is still in here, but if I move it out there and it’s quiet for a while, then I’ll know the last one I brought out there is the culprit!” she declares to me as soon as I come in. Of course immediately, I felt really bad! I look in the lab, and on the floor, she had this huge pile of electronics in the lab she’d been carrying out one piece at a time every five to eight minutes all morning. While I was assessing this, she was talking about how she thought the source might be in this area, or that area, because it sounded like it was coming from here...

So, I had a moral obligation to reveal its location because it was making her nuts. When I told her it was a prank, she told me to F.O. and called me a dork, both half-laughing, half-annoyed. It was hilarious. To see someone who like me, is a control freak, have to be exposed to something so completely out of her power to stop; it was tragic and side-splitting all at once. She said she was even getting paranoid and thinking she was under surveillance or something. I’m sure she will exact retribution on me soon enough. She’s probably biding her time until I get comfortable.

Anyway... BEST. PRANK. EVER. So if you want to slowly drive a coworker insane, I recommend the Annoy-a-Tron. We got the 2.0 version. They also have other devices both my husband and I have been eyeballing for future wickedness.

The Evil-tron is looking pretty appealing.  Whispers and creaking. Muah-ha!
Just my style, stealthy and evil.

Wednesday, August 10, 2011

The controversy of costume!! ::dun dun dunnnnnn:::

Shiny Pink Disco-Ball of Death
There has been a lot of rhetoric flying around lately about costume-authenticity. The Regency Society of America has been buzzing with it amid several of its Chapters including the Oregon Regency Society. Mostly, it’s folks who do full-on reenactment talking about people who do not, but who think they are. I stand firmly on the sidelines on this discussion. I am not a reenactor by any means. Nor do I ever claim to be one. I just like feeling like a girl when I spend most of my time in Jeans and Merrells or riding Jods and paddock boots. Can I claim the most authentic costume? No.

In my dealings with the ORS, and the RSA from the beginning, I have been utterly unable to even pursue the idea of accuracy even if I wanted to; because I just never had the time to put in the hand-sewing and dogged research and dedication required to be a truly authentic ‘reenactor’, let alone develop a character or persona with enough depth and believability to carry them through any extended period. It’s as simple as that. I was too busy with the events and the groups.

People like Katherine here
not only meet the standard,
she kind of creates a standard.
Her work is always exquisite.
Usually, the ORS events worked like this: Spend all the time setting them up, helping other people get ready for them, which often included throwing together at least one or two costumes for them before the event, try to squeeze in enough sewing time to make something for myself (usually the night before, sewing feverishly on my machine at 2AM); then spending the day of the event preparing, and then hurriedly, in whatever space is available on site, throw my costume on, lamenting how frizzy my hair has managed to get during prep time, putting on some foundation makeup to hide my stress-induced rosacea, pat down ruffled feathers and calm the drama-queens, and then spend the duration of the event running around, taking money, welcoming new members, doing interviews with media if they were present, and putting out fires. Then I would suddenly find myself standing there stunned at the end of the night feeling like I’ve been shot through a wormhole. I do sometimes find time to dance here and there, but rarely have I ever had the luxury to take the time to properly prepare myself for an event, make myself costumes that aren’t thrown-together last-minute (and therefore dooming myself to costume malfunctions) or even make myself fully presentable. Other ORS leaders have put their own enjoyment before the membership’s, and have been known to leave early during preparation time, and arrive late to the events having perfectly buffed and coiled side-curls, and pearls in their hair. But that was never my lot. I’ve always been hurried and disheveled. It was just the way things were until recently, when I managed to find people to organize things and maintain the vision without trying to turn the group into their own little fiefdom. People who care more about the mission and the membership than they do about credit-mongering and 100% enjoyment for themselves.

So if *I* can’t even uphold a strict standard of accuracy, as the founder of the Oregon Regency Society and the Regency Society of America, who the hell am I to impose that standard on anyone else? Besides, the ORS and the RSA are and always have been umbrella groups that include all manner of Regency enthusiasts, which include reenactors. The ORS is not in any place to impose a standard besides “try your very best” on its members and the RSA member groups.


The Shining
Caped Crusader
of Wall Treatments.
That’s why it’s okay if you show up to most of our events in a prom-gown if you want; as long as you keep trying. And I’ve noticed, over these past five years, that the pattern is this: Someone arrives in a questionable costume, and they meet us, and we are accepting and kind and open, and they see some of those who *are* beautifully appointed in really gorgeous Regency costumes, and that person asks what patterns were used, and asks what fabrics were used, and they ask how the amazing hair was achieved. They find sources, learn special tips, research things, maybe conferring and soliciting the services of one of our many in-group costumers. A few events go by and they show up in something incredible. It’s organic, some people migrate into it much more quickly than others, but it is inevitable, and as long as nobody treats them badly and drives them away with a condescending attitude, they inevitably come around.

Most importantly, you don't have to be either perfect by re-enactor standard, nor do you have to be the disco-ball of death. There is a perfectly acceptable in-between that is achievable by anyone, with only a bit of care taken in your choice of patterns and your choice of fabrics.  It will deflect the criticism, and it will create a precedent that disco-balls can follow.  The ORS applauds the in-betweeners.  *I* have been an in-betweener. I've covered overly shiny fabric with black voile, I've worn my modern glasses with all my gowns, I've spray-painted shoes... Hell, I've even made a gown from two packages of window sheers from Fred Meyer! And that's okay.  I've made a concerted effort to at least *try* to look the part using my best resources available for my quick-and-easy approach these past five years.  Now that I have found good leadership, I am now somewhat free to delve a little deeper into the authenticity, by trying to hand-sew and drape more, embracing more natural fabrics, and taking my time to research the gowns I want to make. Will I ever acheive reenactor standards? Probably not. But since I am ORS and not a reenactor, that's totally fine.

That has been my policy with both the RSA and the ORS. We embrace anyone who really makes tremendous effort, and we are accepting of those who are new to it and who want to learn. There are also inevitably the people who just don’t care. They show up in shining synthetic fabrics made with really bad Halloween-style patterns, and they have no desire to change or improve, and that’s okay too. If they’re there to feel princessy, dance, and feel dainty, we’re okay with that—and the group’s attitude should be ‘live and let live’, and we should be welcoming and kind, and keep our snickers to ourselves. Being mean and catty, it’s just not my style and I hope that tolerance and kindness are employed by all.

I confess I do snicker sometimes in secret with my closest friends in the group, I *do* giggle at really bad costumes, I would be lying if I claimed that I did not. But I do it in private. I try to be classy enough not do it overtly or mockingly at the person in question; hurting their feelings. I will even often compliment them on their efforts—because even if it is Halloween quality, it’s still an effort nonetheless, and a start. They might feel more compelled to try harder if you are kinder to them and you don’t ‘educate’ them in a patronizing and condescending way.

HOWEVER, in order to at least temper the abusiveness of the established folks in your desired Regency group (if you are about to join one, or have joined and have been ridiculed), I am offering the following recommendations for those of you who don’t really know where to begin, and what patterns and fabrics to use, here are my recommendations:

Here are some COMMERCIAL patterns I do NOT recommend:


Butterick 6630

This pattern is terrible, I am very sorry to say. The gowns are like tubes, the bodice is simply not workable for anyone over a B cup. There is no ‘waistline’ to speak of. The bodice seam just transitions to the skirt with little distinction and there are no gathers or pleats or textures that gowns of the period typically had. The pattern can be altered to work, but the sleeves are also way too puffy and large. If you want a nice regency gown for a costuming group or reenactment, this gown will NOT do.

Butterick B4890

The over-gown/robe is at least gathered at the back, but the sleeves again are too poofy; but compared to the 6630, it’s a slightly better pattern; but frankly, still too Halloween.

Butterick 6631


This pattern is out of print (probably thankfully). But it can still be found on Amazon and eBay for the dogged person who likes over-froofy skirts and weird looking spencers. Not recommended


Simplicity 9221


No entirely hideous, but also not entirely correct. The spencer is not at all correct. It’s still better than the Butterick Patterns. Out of print but available on Amazon & eBay. The sleeves on that blue gown are scary, bu tthe little one in the inset looks very nice. No idea what the backside looks like on either gown.

Simplicity 9225


Reports are that the skirt is very narrow. The gown (sans all the extra floof) should be 1790ish, but requires some modification to make it more accurate to the period. Out of print but findable on Amazon & eBay. I have no idea about this gown, but I don't recommend it if you're a beginner, because modification would be required.

Burda 2493


Modern closures in back, not the correct cut, but not the most hideous of beginner’s patterns. Still, there are LOTS of better patterns to, more accurate BY FAR choose from.

COMMERCIAL Patterns I would recommend to newcomers:

Simplicity 4055


Most recommended dress for beginners. It is a conservative cut, even with the wider ‘ballgown’ neckline, but it’s still a lovely silhouette. BUT as with ALL these gowns, you *should* be wearing regency underpinnings and stays.


Simplicity 8399 (VIEW B ONLY)


Although advertised as the Edwardian gown, it works beautifully as a Regency Ballgown. The silhouette is beautiful.

There’s a great place to start if you want to throw together something for an ORS event. If you are looking for accuracy, then we can start talking about the non-commercial, historic patterns that are readily available online. Feel free to bug me if you want more information on the specialty patterns that many of the serious reenactors use.

Fabrics:

STAY AWAY FROM SYNTHETICS! Period! There are a few ‘faux’ silks and taffetas that are workable, but please, please, please, don’t grab at the nearest shiny, froofy stuff and think, whoa, this would be so Cinderella! Synthetics are TERRIBLE in flash photography. People with respectable-looking gowns end up looking like disco-balls in too-shiny fabrics. I’d show you samples from some of our events, but I risk hurting people’s feelings. Stay away from lining material, slippy, slinky fabrics or anything with a tremendous shine to it.

There are some synthetics that may work, but choose the kind with matte finishes and that are delicate and not so modern-looking if you must choose synthetic materials.

Keep it light and natural! Linens and cottons for daygowns. Silks for ballgowns. Cotton nets, voile, lawn, organdy... you can get away with sheers for ballgowns anytime. Delicate cotton prints (no huge Victorian patterns please!) pastels, jewel tones, white... Delicate laces (again, no huge flowery Victorian laces), simple and beautiful.

If you start with natural fabrics, using a somewhat respectable commercial pattern, you're less likely to be raked across the coals by the meanies.  But you can rest assured, that no matter what you show up in at our events (the ORS) that you are always welcome.  And don't take it personally if we start suggesting patterns or fabrics in a kind way. We're not being evil, just trying to be helpful. ;)

Monday, August 1, 2011

A full weekend on horse.

What a weekend! Holy cannoli! First we rushed off Friday afternoon to camp at Timothy Lake.  We had a lovely time there. I got two long rides in, one Friday evening and the second Saturday morning-ish (after we managed to get our collective shit together--there was plenty of fussing and dilly-dallying while many of us were already in saddle and ready to go.  Urgh.  Tag had a good time. He really enjoyed leading the group the best, and was at his best at that moment. He only acted stupid a few times, and I was pretty much prepared for his antics to begin with, so nothing negative happened to speak of.  The only bad thing was my hubby froze on Friday night, and we were awoken by a neighbouring horse that just wouldn't stop blasting out these deafening whinneys all morning.   The trails were mildly technical, strewn with rocks and claptrap, and some spots I'm surprised my draught horse could squeeze through. Once, I had to lift my legs and prop them in front of my saddle just to make it through unscathed.  Hee. Here are some random pics of the day:

Friday night's 'community camp fire'. Our barn folks gathered together
to gaze at a huge fire and BS for a few hours.

Tag seems to like his log-stall.

Camera was hanging from the ring on my saddle, so all pics on horse
were taken at hip-level. :)

I just loved his shadow and his little crest of mane. :)

"Come on people! Let's go!" Tag says.

All geared up on Saturday morning.

Our little tent right next to the enclosure. The whinneys were our
alarm clock.

I like my tack. What can I say?

Muzzles are adorable.

My little English saddle seems incongruous sitting atop a stack of
Western saddles.

The wetland near our camp.

I've posted my gathered/ruched secret gown project separately on this day. You can find it here: Gathered gown

The gathered/ruched crossover regency gown

I have been slaving away these past weeks on a new gown of a different style than I usually wear, and I wore it Sunday and it was so great, I can't help but pat myself on the shoulder for it. NO COSTUME MALFUNCTIONS! That's really something if you know how often I am afflicted with costume-issues.

The gathered/pleated gown.

This picture is THE BOMB. No double chin showing to boot! Thanks S-2!
 I’m sorry I didn’t take any progress photos. I don’t have a decent camera except the one of my phone and in the darkness of our cave-like cabin the images simply would not turn out nicely. So I opted instead to do my little drawings and to take pictures of the final product outdoors.

The ‘base bodice’

I started by draping the ‘base’ bodice. This gown probably could be made without a base bodice, it would be a lot more challenging and harder to build if I didn’t have the base upon which to hang the outer fabric. It also helped determine the shape of the gown. You could use a standard front-opening regency bodice pattern to do this, but I chose to drape it on my dress-form for a good fit and also because I wanted a particular shape. I didn’t really want the wider neck of a standard day-gown. I also just wanted a good fit on the back. I wanted the back neckline to be right up to the neck, and the shoulders straps to be wider than usual.


So I got a piece of cheap muslin to pattern with and laid it on the back of my dress form. I used my hand to smooth it down flat on one side of the back so there were no wrinkles or rumples, and then drew out the back piece, using the center back as the ‘fold’ side. I cut it out and then put it back on the dress-form. I then moved onto the side/front, leaving my newly cut back piece sitting in place for reference and shape-matching.

Using the same piece of muslin, I wrapped the half of the dress form, pressed the fabric flat where I wanted it, and then starting at the back, I matched the curve of the notch in the back piece and then drew the waistline, arm-hole, shoulder strap and then the front flaps. I made sure the shoulder met the edge of the shoulder of the back piece, and was lying correctly along the shape of the dress-form/body without rumples or creases.

Please keep this in mind as you drape; modern dress forms have the breasts in a more natural location than the position you would need for a regency silhouette, so when I cut my pieces, I let the front flaps hang a bit diagonally down over the front of the form to compensate for the higher regency position of the breast. It’s hard to explain, but that’s how it works.

I recommend, if you aren’t confident about draping on-the-fly (like everything else I do), that either you leave the flaps long and adjust when it’s on you, or you can make yourself a dress form with the proper silhouette by using one of these methods with your regency stays on underneath (which would be really advantageous to have if you make yourself a lot of regency-period costumes). Either that, or you go with the sides and back pieces of a regency bib-front pattern, which can be easily adjusted with wider shoulder straps and higher back.


Once I got those two shapes drawn out on the muslin and cut out as pattern pieces, I cut them in the actual fabric with a ¼ inch seam allowance all ‘round (the center back on the fold). I cut four side/fronts, two backs on the fold, and then sewed each layer of the bodice individually. I hand-sewed everything on this project (I know, really?! Me??? Hand-sewing? Who knew!) But I discovered that hand-sewing is not quite as messy as machine sewing is, it takes less room if you’re working off of a dress-form, and you can relax and watch Doc Martin while you’re stitching away instead of being hunched over a sewing machine squinting at your needle-threader. Aaaanyway, I stitched the curved notches to the back, and then pressed them, and affixed the shoulder-straps to the back. When I had both layers completed and pressed, I laid the two layers good sides in, and sewed all the way around the neckline, from the bottom corner of the front flap, around the neckline.


Does this look familiar? Yes, because I it’s the same thing I did with the bib-front bodice. Only this time, I pressed and folded-in the raw edges on the armseyes and bottom of the bodice, and whip-stitched those closed so they look tidy.

The next step was to create the drawstring channels. I was deliberately loose and careless on this step, and sewed with wide, often irregular running stitches. The first channel follows the neckline from the top of the front-flap around. The second channel goes along the bottom edge of the bodice. I snipped four tiny holes at the edge of the front flaps and buttonhole-stitched around the edges of them so there was a nice, neat access to the channel. I also added two hooks and eyes to the front-closure to keep the sides from separating, which happens a lot with drawstring gowns. A hook and eye will solve any unseemly gaps. I strung some very fine twill tape through the neckline and around the waistline channels and voila. The ‘base’ for the gown was done.


The Gown


A rough-cut measure. Everything was done
'by-eye' on this project. I'm comfortable
experimenting. Lots of people aren't;
there's nothing wrong with that. :)
I then fitted my base-bodice onto the dress-form (tying only the top drawstring), and got my gown fabric. The bodice base I made from very light-weight cotton, almost handkerchief-weight. The gown fabric should also be something delicate and light, because with all the gathering and pleating, with a heavier fabric it could get really bulky. The fabric I used was five yards of sheer patterned voile. Five yards is plenty of fabric for a regency gown, although I’ve been known to use up to eight for when I’m in a pleating frenzy. But even a full figured girl can have lots of volume with five yards.

Anyway, I started with the front by laying the cut edge of the fabric (still folded at this point) at the top for the shoulder, and pinning it there and then dropping the fabric down to the ground. There, I cut the length off below the hemline so I can hem it up later. The front is one panel of fabric. I then unfolded the fabric to its full width and marked the center where it was folded.


I cut down about 12” down the center-front. I then rolled the cut edges in, and began to whipstitch the roll into place. That will be the front opening.

The next step is among the trickiest of parts, because what you need to do is pin the side of the dress so that you can cut the armseyes and insure that the side seam of the skirts is in the right place. So I had to center the edge of each side of the front fabric to the middle of the arm and pin it to the top and bottom center of the arm opening; all the while watching that I wasn’t dropping the hem or pinning it too high. Then I wrapped the fabric onto the shoulder and chest and smoothed it along the shoulder edge to the top of the shoulder and locked the area around the arms in place with pins, leaving the rest of that panel of fabric free. Then I was free to affix the armseye. I cut out the half of the armseye covered in fabric, turned the edges in, whip-stitching the side to the shoulders of the base-bodice. I did leave an inch or two of the fabric loose at the bottom of the armseye where it will be stitched to the fabric of the back of the gown, so I can seam them together.


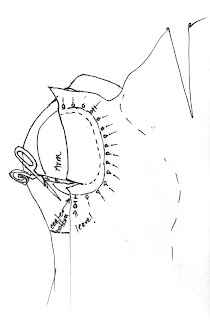
Once the edge of the arms were sewn into place, I did a wide running stitch along the top edge of each cut shoulder side, and then gathered it up tightly to fit the width of the shoulder. I affixed the gathered top to the seam on the bodice shoulder with a strong line of double stitching (watch not to sew through your drawstring!!), being sure to pull the gathers down tightly. I then did the same to the other side.


I drew this twice because I thought the way I drew it above
looked weird.
The front is done at this point (except the last bit with the drawstring at the waist, but that comes close to the end).

Now it was time to tackle the back. For that, I drew out two lengths of the fabric, which left just enough for the sleeves. Opened the first panel up to cover one half of the form, and did the same thing I did with the front; I began by fixing the edge of the fabric to the bottom of the armseye to insure it would match with the front piece, and pinned it in place. I also was careful insure that I left enough of an allowance at the top to fold under and cover the raw edges of the gather on the shoulder and leave a clean line. Once that side was determined and the edge of the top was measured, I got into one of my pleating frenzies.


In this case, I used the pattern of the fabric to help me. There is a thick latticed line that runs vertically through the pattern with a wavy pattern between. Placing one latticed line against the next, I began to pleat along the waistline of the bodice, pinning as I went along, and angling each pleat towards the shoulder, gradually making a sort of sunburst. This is arduous work, but well worth it, and makes for a stunning garment. Once that half was pinned in place the stitching began. :::GROAN::: Holy Hell! What did I get myself into? You could probably make this much simpler if you’re not willing to go through the process of pleating all that material down. You could cut a back to the shape of the bodice, and then sew your gathered or pleated skirts to the bottom of it, that would work too, or do bigger pleats and cut away the excess on the inside once it’s affixed. Either way, that’s what I did on July the 4th. I hand-stitched down pleat after pleat after pleat.


That texture is incredible, I still can't believe how great it looks. :)

Note: I did NOT sew the pleats down to the base bodice. The outer gown hangs completely free of the bodice except at several crucial points; the shoulder seam, the neckline and the armseyes. That’s it. I slid my hand underneath the fabric and carefully inserted the needle from underneath to begin and then did a running stitch upwards, all the while, holding the fabric up from beneath to keep from snagging the fabric of the base bodice. This is NOT necessary, you can very well affix the whole back and side/back to the base bodice as much as you please (avoiding your drawstring with care), but since I want more draw-stringy flexibility, I decided to keep them separate.

I then folded the fabric edges along the neckline under (after trimming), and whip-stitched them to the base bodice. I then seamed the skirts together from under the armseyes to the hem with a simple running stitch (hopefully not too messy). I simply folded one edge onto the other in a tidy line and stitched it down. When that was done, I flat-felled the seam inside just so it looked tidy.

I then pinned the other side of the back to match, and started by seaming the center neatly together, and connected the skirts with another running stitch down the center of the back. I finished that seam within. I then sewed all the pleats down on the other side of the back (which was somehow harder to do on the left side), affixed the neckline and covered the raw gathered edge of the front shoulder with the folded edge of the back. I seamed the other side together from the underarm to the skirts and voila; most of the gown was done. I sewed a simple narrow rolled hem and then cut the sleeves. I used an old self-cut pattern from my old gowns for the sleeve, and found they are much too large. They will have to be taken in and fitted better to my arm later on. But you can always cut the sleeves from any number of patterns. These are elbow-length sleeves, and I’m pretty sure you can find nice patterns for those in the Mode Bagatelle pattern or whatnot. Or you can attempt to drape your own.


The very last step after all the hemming and such was to add the drawstring to the gown layer to fit all this gathered and pleated fabric to my empire waistline. The first step was to put on the gown and put pins to mark the places in the front where I would want to drawstring to rest. I then got some inch-wide twill and inside the gown, I started at the center back. Using the line of the underbodice back, I stitched the tape down inside the gown. I stitched each long edge, leaving a channel for the drawstring. When I reached the marking pins on the side and front, I simply followed along this pin-marked line. I did not stitch the twill channel to the edge of the front opening. If I had, I would not have been able to have the small crossover of fabric I was hoping for. So I left about 2 inches on each side of the opening, and then added a small hook and eye so when the drawstring was closed, I could secure the crossover just by hooking it.

That’s it. That’s my latest gown project. It was FUN but a LOT OF WORK! I’m fairly sure there are a lot of ways to make a project like this much easier, but leave it to me to find my own inventive methods. All in all, this has to be my favourite Regency gown of all. It FITS ME, which is perfect! For once something was made for my shape and my shape alone! Yay for draping! I had no costume malfunctions on Sunday at all, and usually I always do! This gown gave me no trouble at all. The only downside was that the crossover occasionally widened to reveal the little top bow on my under-bodice. Big whoop! I love this gown!


Also, for an addendum: here are photos of the little dresses that I draped on the two little girls. The only challenge of draping these was that their little arms were not detachable and that made shaping the side-front pieces a bit challenging.


The bodices are made as most regency bodices are made, except that I made them back closing, and chose drawstrings at the neckline and the waist to insure a proper fit (with hooks and eyes to keep them from gapping too much). I also made the front bodice panel wider than normal so it could be tightly gathered. The only error here is that I forgot to add a seam allowance to the waistline when I was cutting them, so the bodices are remarkably short .. but still precious. I threw together a couple of bonnets for the girls and voila... cuteness off the charts! Although I have resolved that as much as it was nice to allow the girls to pick their own fabric, next time it’s going to be sheer white gowns with silk sashes. Squee!

Today's not SO much of a mumbly Monday because in spite of being exhausted, and that I twisted my ankle today, I am still glowing from a wonderful weekend. :)

LinkWithin

Related Posts with Thumbnails